Sivace is built to convert passive web traffic into active business opportunities. Unlike old-school chatbots that rely on rigid, pre-programmed decision trees, Sivace operates on semantic search and conversational AI. It acts as an autonomous member of your sales and support teams—operating 24/7, answering customer questions accurately, qualifying leads, booking meetings, and syncing data to your CRM.
The Core Architecture
The system is divided into three distinct stages: **Knowledge Acquisition**, **Conversational Reasoning**, and **Action/Integration Execution**.
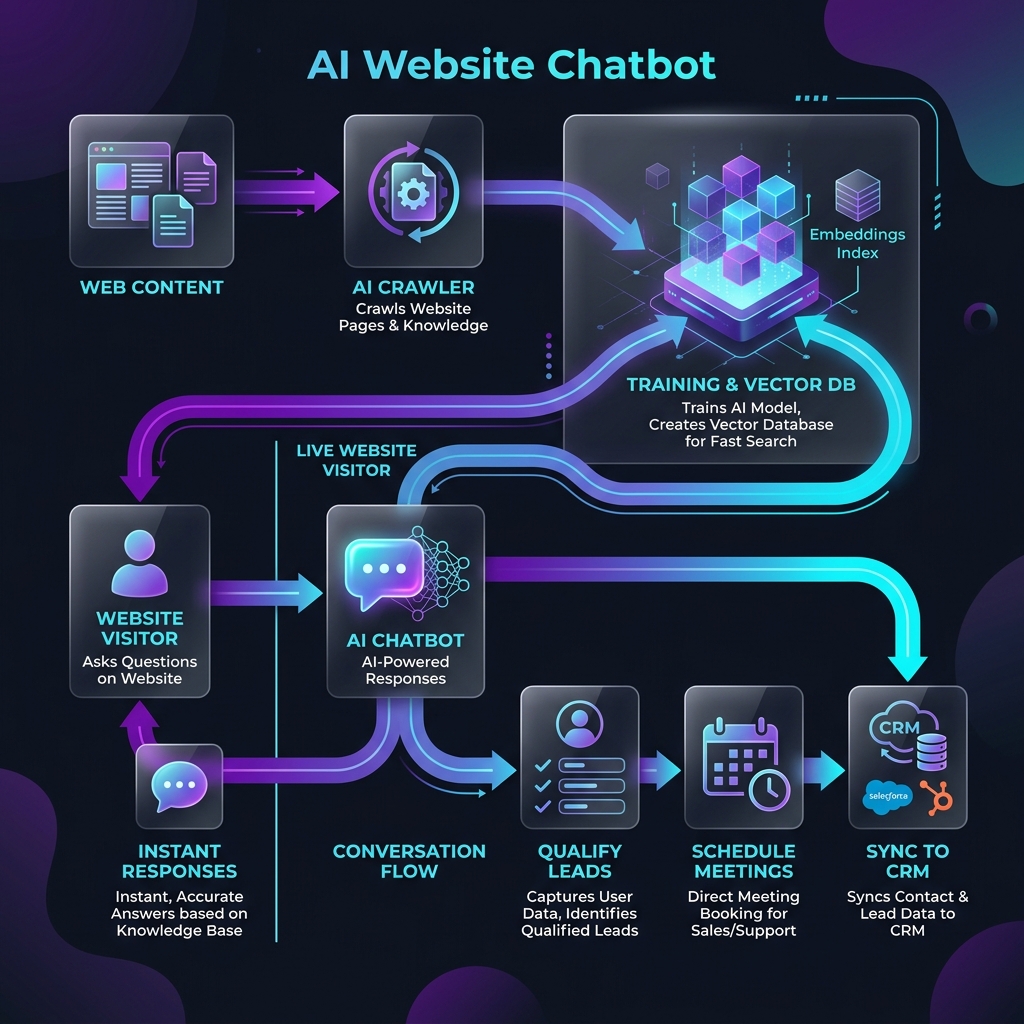
1. Automated Knowledge Acquisition
Sivace builds a custom brain for your business. When you provide your website URL or upload internal documents (like policy PDFs, guides, and manuals), our ingestion engine crawls, sanitizes, and breaks down the text into chunks. These chunks are converted into multi-dimensional vector embeddings and indexed in a secure vector database. This allows the AI to search your business knowledge at millisecond speeds when a visitor asks a question.
2. Conversational Reasoning
When a visitor sends a message, Sivace retrieves the most relevant knowledge chunks from the vector database and feeds them to the LLM (Large Language Model) context window. This ensures that every response is factually accurate, highly relevant, and safe from generic AI hallucinations. It responds in natural, human-like language custom-tailored to your brand guidelines.
3. Qualified Action Execution
Sivace is trained to recognize buying signals and high-intent queries. If a user expresses interest in a specific service or requests a callback, the chatbot initiates lead qualification (collecting name, email, phone number, and intent level), schedules calendar appointments on your integrated booking system, and instantly pushes that structured contact record to your CRMs like HubSpot or Salesforce.
Key Architectural Benefits
- Zero Hallucinations: The chatbot only references facts present in your vector index. If a fact isn't found, it gracefully routes the question or asks for contact info.
- Blazing Fast: Leverages optimized AWS DynamoDB caches and CDN-routed scripts to deliver near-instant response times.
- GDPR & SOC2 Friendly: Customer conversations and training indexes are isolated and encrypted in transit and at rest.
Setup & Integration Guides
Deploying Sivace is as simple as inserting a single line of script code into your website's HTML header. Here is how to add the chatbot to your preferred web builder platform:
1. How to Add Sivace to WordPress
To add the chatbot to your WordPress site without editing core theme files, use a header/footer injection plugin:
- Log in to your WordPress Dashboard.
- Go to Plugins > Add New, search for "Insert Headers and Footers" (by WPCode), and click Install Now then Activate.
- Navigate to the new Code Snippets > Header & Footer section in your WordPress sidebar.
- Locate your Sivace widget script tag (found in your Sivace Dashboard under Widget Settings) and paste it directly into the Header text area.
- Click Save Changes. Refresh your WordPress homepage, and the chatbot widget will appear in the bottom right corner.
2. How to Add Sivace to Shopify
You can easily install the script directly into your Shopify store's theme template:
- Log in to your Shopify Admin panel.
- Navigate to Online Store > Themes. Click the three dots (...) next to your active theme and select Edit Code.
- Under the Layout directory, open the
theme.liquidfile. - Scroll down until you find the opening
<head>tag or the closing</head>tag. - Paste your Sivace script snippet immediately before the closing
</head>tag. - Click Save. The chatbot is now live on your product and checkout preview pages.
3. How to Add Sivace to a Wix Site
Wix allows header injections using their Custom Code settings under Settings:
- Log in to your Wix Dashboard and open the website editor/dashboard for your site.
- In the left-hand navigation sidebar, scroll down and click Settings, then select Custom Code (under the Advanced section).
- Click the + Add Custom Code button in the top right.
- Paste your Sivace widget script snippet into the text area.
- Under Name, enter "Sivace Chatbot". Under Add Code to Pages, select All Pages and choose Load code on each new page.
- Under Place Code in, select Head. Click Apply. Publish your site to activate the widget.